
Single-Use Acetabular Reamers
Sales Training and Surgical Tips
Determine Reamer Size
Template preoperatively and estimate the size of the reamer required for the case. Once the femoral neck has been divided, measure the diameter of the femoral head with a caliper. Employing both measurements, the size of the single acetabular reamer required can be reliably determined. The correct size sterile single-use reamer can then be opened.
Open Sterile Package
ETO Sterile packaging is a double barrier blister design consistent with sterile implants. The package is opened, the outer blister peel removed and the inner blister with the reamer is given to the nurse in the sterile field.


Sterile inner blister
handed to nurse
Nurse opens
inner blister
Sterile reamer
is removed
Reamer Assembly to Shaft
As with other acetabular reamers with the crossbar design, the reamer is assembled to the reamer shaft by retracting the lock and assembling the reamer to the drive end and twisting it to lock in place.
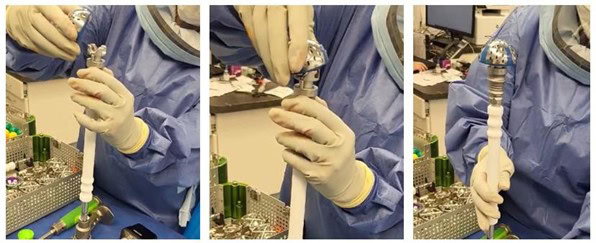
Retract reamer
shaft lock
Place reamer
crossbar into the shaft slots
Turn reamer and
release lock
Sequential Reaming vs. One S-U Acetabular Reamer
Only one OsteoFit single-use acetabular reamer is usually required per case. When multiple communityused reamers are used sequentially, some of the reamed debris is removed with each one. When only one reamer is employed, it may fill with debris and the cutting efficiency may decrease. If this occurs, detach the reamer from the reamer shaft, empty and irrigate the reamer. The reamer is still sharp and will function normally when reinserted.

Start Reaming
Reaming complete
Debris collected
within reamer
*Debris collected within reamer: Smaller reamers (45mm, 46mm, 47mm, 48mm, and 49mm) should be disassembled from the shaft and cleaned at 50% – 75% completion point. Reassemble the reamer after cleaning and continue the surgery.
Surgical Tips
The single-use acetabular reamers are used in THA procedures including anterior and posterior approaches and with conventional reamer shafts (crossbar design) and robots.
Reaming to the depth of the fovea is usually the objective. Removing any medial osteophyte with a gouge before reaming will both define the level to be reached and make the actual reaming easier.
When retracting soft tissue either with pins or retractors, attention should be given to avoiding contact of the reamer with these metal instruments. If damage occurs to the reamer, it should be inspected and assessed prior to continuing to ream. This issue is consistent whether it is a Single-Use (S-U) or Community-Used (C-U) acetabular reamer.

Position of Retractors
Position of Pin & Retractors
Use of the sharp OsteoFit Single-Use Reamer requires only moderate pressure. Place the reamer in the acetabulum and let the reamer cut. It is not necessary to push hard.
Bone graft created with the S-U acetabular reamer has a putty consistency making packing for defects easier to keep the graft in place.
